
As you may know already if you’ve read this blog before – I teach online. I’m working at a virtual K-12 school in Michigan as the High School Math/Science Title 1 teacher. This week in my graduate class at MSU, CEP 811, I was asked to evaluate my current classroom design and re-imagine a new environment to help my students function better. I decided to think back a couple years when I worked at a brick-and-mortar school in West Virginia to complete this assignment so that I would have a physical space to “work with” virtually.
As I prepared for this week I watched many videos about concentrating on the experience of education. That means focusing on the content as well as the physical space, emotional connections, ways students can participate in the space, the flow of the classroom, and more! The one that really inspired me the most was a short video with a cliff hanger that I’ve experienced many times while watching HGTV (anyone else relate in a similar way?)
I got caught up in the excitement from the teacher, students, and designers. I was immediately drawn back into my room in West Virginia where my classroom set up wasn’t great. The desks were those that only had one way to get into them. There was one left-handed desk and the rest were built for right handed people. When I tried to set up groups there were always students “trapped” in their desk while in the group. The walls were painted in a material that seemed to resist all adhesives and therefore were pretty blank of posters or student work. I had student desks and my large desk, but no other table surfaces. While watching the video I was reminded of statements students said spontaneously about my classroom without conducting a workshop. “Why is all the paper in the back?” “Why have a desk if you never use it?” “Why do we still have an actual chalkboard? Do we even have chalk?” “This carpet is disgusting!”
I used SketchUp to model my ideal classroom experience. I imagine tile or vinyl flooring for easy cleanup. I try to do as many projects as possible in my classroom and they can get messy and this flooring would help that process. This would ease the stress of students as well. I imagine this would cost around $2000.00.

I would remove my desk and in the back of the classroom set up an interactive notebook station (Wist). This station would have all the materials in easy to grab locations; pens, pencils, markers, glue, scissors, colored paper, hole punch, glue, staplers, prepared foldables, and any other materials I might need. The cubes would hold books, manipulatives, and be a resting space for students’ group work. Using wood from a home improvement store I imagine this costing around $500.00.

A couple standing stations along the back of the classroom would allow for additional collaboration locations as well as provide a space for students with ADD, ADHD, or just need to stand while they learn (Richards, 2008). These stations would allow students to stand while still having a workspace at their new level to work with. I imagine these costing around $300.00.
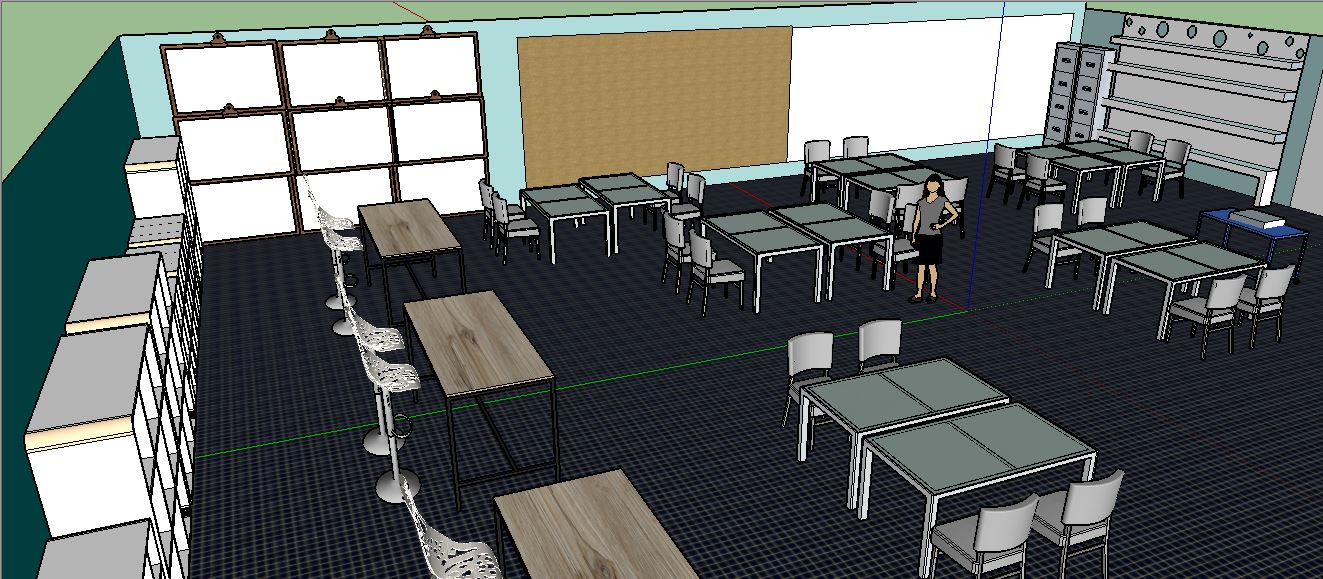
Tables would replace the single desks to allow for easy group work and collaboration (Ward, 1987). These would be set up in groups of four, but might move depending on the lesson. They would be spread out in the room and all for there to be multiple “fronts” of the room (Mastrine, 2012). My workstation with a projector and Elmo being on wheels would help with this ease of motion. As well as there being white boards on three of the walls so that I can set up a viewing area with the projector on multiple walls for whole class or just individual group lessons. I imagine this costing around $2,000.00.

Two tables would frame the door. These would have areas for turning in assignments, picking up graded work, and the “group of the week” award.

In order to pay for this renovation I would contact students and parents to ask for support. This could be donated in money, connections to vendors, manual labor, additional ideas, etc. I would also apply for grants and ask local businesses for help. Having my idea mapped out in SketchUp would probably help with my plea for assistance since a detailed visual would be provided complete with reasoning. This would not all need to happen at once and could (and most likely would be) a multiple year process.
Now if you, like me, were wondering about how Steve Mattice’s classroom ended up looking after the “big reveal” that was shown in the video above, don’t worry. I tracked it down for me you. It’s a three part series, but you can click here for the first part. or here to really skip to the end. 🙂
References
1. Deardorff, Julie. (2012). Standing desks: The classroom of the future? Chicago Tribune. Retrieved August 2, 2014 from http://articles.chicagotribune.com/2012-08-07/health/chi-standing-desks-the-classroom-of-the-future-20120807_1_desks-standings-classroom
2. Mastrine, Jule. (2012). Does where you sit in the classroom say a lot about you?. USA Today. Retrieved August 2, 2014 from http://college.usatoday.com/2012/01/05/does-where-you-sit-in-class-say-a-lot-about-you/
3. Richards, Eric. (2008). Stand-Up desks provide a firm footing for fidgety students. Milwaukee Wisconsin Journal Sentinel. Retrieved August 2, 2014 from http://www.jsonline.com/news/education/32501809.html
4. Ward, Beatrice. (1987). Instructional Grouping in the Classroom. School Improvement Research Series, Close-Up #2. Retrieved August 2, 2014 from http://educationnorthwest.org/sites/default/files/instructional-grouping.pdf
5. Wist, Caroline. Putting it all Together; Understanding the Research Behind Interactive Notebooks. The College of William and Mary. Retrieved August 2, 2014 from http://interactivenotebooks.wikispaces.com/file/view/ISN-Research+Based.pdf
